Remote IoT monitoring using Raspberry Pi has become a game-changer in modern technology, enabling users to control and manage devices from anywhere in the world. With the rise of the Internet of Things (IoT), remote monitoring solutions are no longer limited to large corporations. Now, hobbyists, small businesses, and even individual users can leverage the power of Raspberry Pi to create cost-effective and scalable IoT systems. This guide will walk you through everything you need to know about setting up a remote IoT monitoring system with Raspberry Pi.
Whether you're monitoring environmental conditions, tracking industrial equipment, or simply automating your home, this guide will provide you with actionable insights and practical tips. By the end of this article, you'll have a solid understanding of how to build and deploy your own remote IoT monitoring solution using Raspberry Pi.
Before we dive into the technical details, let's explore why remote IoT monitoring with Raspberry Pi is such a powerful tool. The combination of Raspberry Pi's affordability, versatility, and the vast array of IoT sensors available makes it an ideal platform for beginners and professionals alike. Let's get started!
Read also:Vicente Fernandez Jr The Life Of A Music Legend
Table of Contents
- Introduction to Remote IoT Monitoring with Raspberry Pi
- Understanding Raspberry Pi
- What is IoT?
- Benefits of Remote IoT Monitoring
- Setting Up Your Raspberry Pi for IoT
- Integrating Sensors with Raspberry Pi
- Networking and Connectivity
- Managing IoT Data
- Ensuring IoT Security
- Applications of Remote IoT Monitoring
- Conclusion and Next Steps
Introduction to Remote IoT Monitoring with Raspberry Pi
Remote IoT monitoring with Raspberry Pi is a rapidly growing field that combines the power of IoT with the flexibility of a low-cost, compact computing device. By integrating Raspberry Pi with IoT sensors and cloud platforms, users can create systems capable of monitoring and controlling various devices remotely. This technology is widely used in industries such as agriculture, healthcare, manufacturing, and smart homes.
One of the key advantages of using Raspberry Pi for IoT monitoring is its ability to handle complex tasks while remaining affordable. Additionally, Raspberry Pi supports a wide range of programming languages, making it accessible to developers with varying levels of expertise. With the right setup, you can monitor temperature, humidity, energy consumption, and much more from any location with an internet connection.
Understanding Raspberry Pi
Raspberry Pi Specifications
Raspberry Pi is a series of small single-board computers developed by the Raspberry Pi Foundation. These devices are designed to promote the teaching of basic computer science in schools and developing countries. Over time, Raspberry Pi has evolved into a versatile platform used for a variety of applications, including IoT projects.
- Processor: Broadcom BCM2835 or later models
- Memory: 1GB to 8GB RAM, depending on the model
- Storage: MicroSD card slot for operating system and data storage
- Connectivity: Wi-Fi, Bluetooth, Ethernet (varies by model)
- GPIO Pins: General-purpose input/output pins for connecting sensors and actuators
Why Choose Raspberry Pi for IoT?
Raspberry Pi is an excellent choice for IoT projects due to its affordability, ease of use, and extensive community support. It runs on Linux-based operating systems such as Raspbian, which provides a robust platform for developing IoT applications. Additionally, Raspberry Pi's GPIO pins make it easy to connect external sensors and devices, enabling you to build sophisticated monitoring systems.
What is IoT?
The Internet of Things (IoT) refers to the network of physical devices, vehicles, appliances, and other objects embedded with sensors, software, and connectivity that allow them to exchange data. IoT systems enable devices to communicate with each other and with users, creating opportunities for automation, efficiency, and innovation.
In the context of remote IoT monitoring with Raspberry Pi, IoT involves collecting data from sensors connected to the Raspberry Pi and transmitting that data to a central server or cloud platform for analysis and visualization. This allows users to monitor and control devices remotely, regardless of their physical location.
Read also:Discover Unseen Images Of Melanie Martinez Explore Her Enchanting Visual World
Benefits of Remote IoT Monitoring
Increased Efficiency
Remote IoT monitoring allows businesses and individuals to optimize their operations by automating routine tasks and reducing the need for manual intervention. For example, in agriculture, remote monitoring of soil moisture levels can help farmers conserve water and improve crop yields.
Cost Savings
By reducing the need for on-site inspections and maintenance, remote IoT monitoring can lead to significant cost savings. Additionally, the use of open-source software and low-cost hardware like Raspberry Pi makes it an attractive option for budget-conscious users.
Improved Decision-Making
Access to real-time data enables users to make informed decisions based on accurate and up-to-date information. Whether you're monitoring energy consumption in a smart home or tracking equipment performance in a factory, remote IoT monitoring provides valuable insights that can lead to better outcomes.
Setting Up Your Raspberry Pi for IoT
Hardware Requirements
To set up your Raspberry Pi for IoT monitoring, you'll need the following hardware components:
- Raspberry Pi (any model with Wi-Fi and Ethernet capabilities)
- MicroSD card with pre-installed Raspbian OS
- Power supply (USB-C or micro-USB, depending on the model)
- Wi-Fi dongle (if your Raspberry Pi model does not have built-in Wi-Fi)
- Case for Raspberry Pi (optional)
Software Setup
Once you have your hardware ready, you can begin setting up the software. Start by installing Raspbian, the official operating system for Raspberry Pi, on your MicroSD card. Next, configure your Wi-Fi settings and update the system to ensure you have the latest software versions.
Integrating Sensors with Raspberry Pi
Choosing the Right Sensors
Selecting the appropriate sensors for your IoT project depends on the specific requirements of your application. Common sensors used in IoT projects include:
- Temperature and humidity sensors (e.g., DHT11, DHT22)
- Light sensors (e.g., LDR, BH1750)
- Pressure sensors (e.g., BMP180, BMP280)
- Gas sensors (e.g., MQ-2, MQ-7)
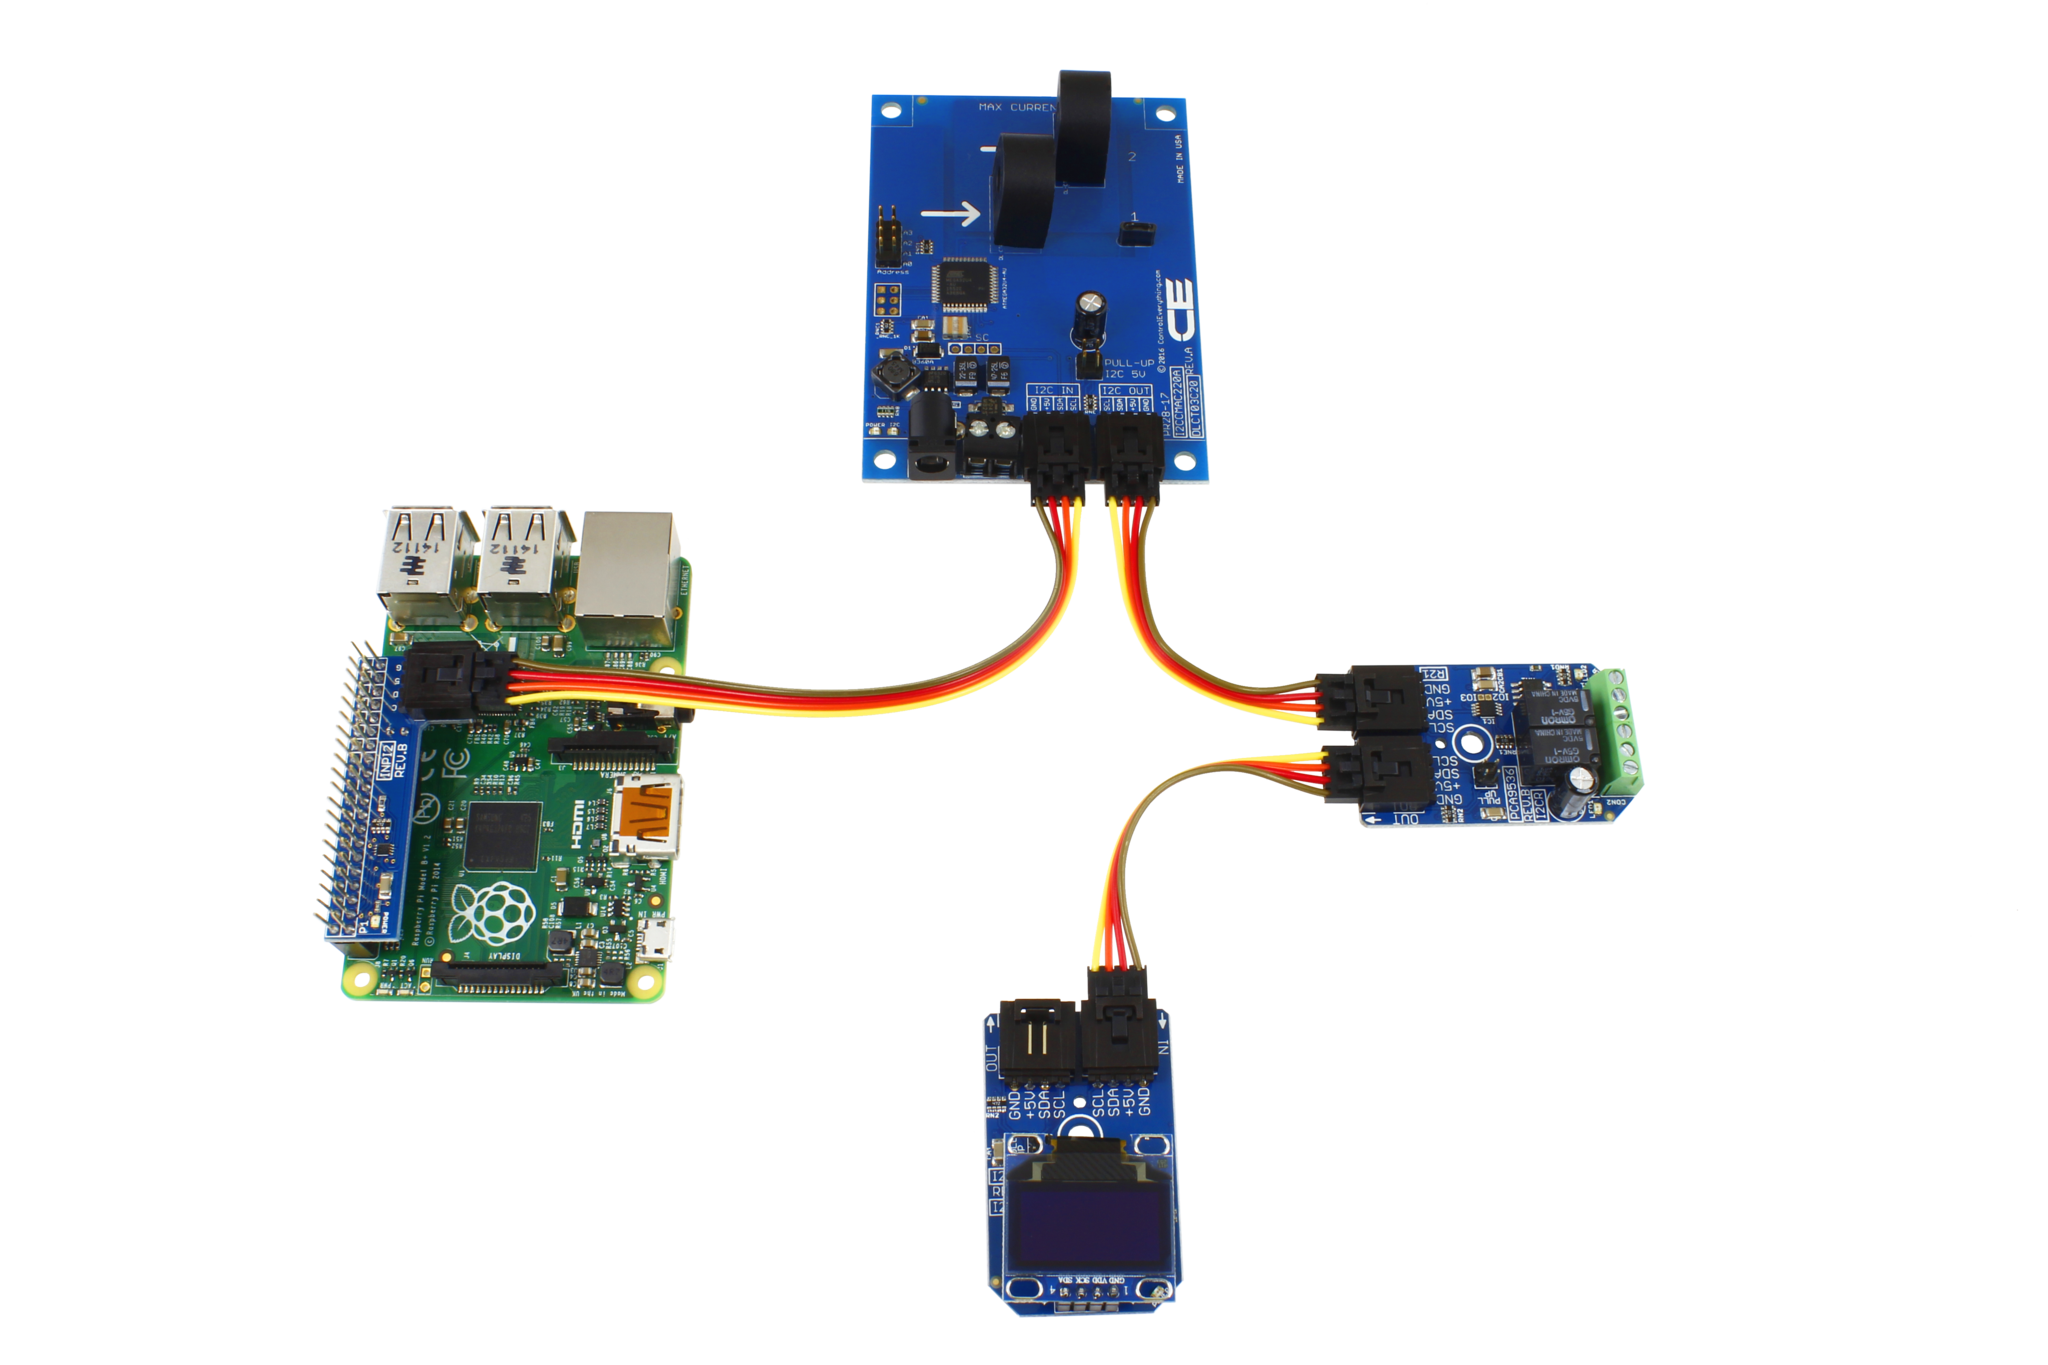
Connecting Sensors to Raspberry Pi
Most sensors can be connected to Raspberry Pi using GPIO pins. Depending on the sensor type, you may need to use additional components such as resistors or level shifters. Follow the manufacturer's instructions for wiring and configuration to ensure proper functionality.
Networking and Connectivity
Establishing a reliable network connection is crucial for remote IoT monitoring with Raspberry Pi. You can connect your Raspberry Pi to the internet using Wi-Fi or Ethernet, depending on your setup. Additionally, consider using a cloud platform such as AWS IoT, Microsoft Azure, or Google Cloud to store and analyze your data.
Managing IoT Data
Data Collection
Data collection involves reading sensor values and storing them in a structured format for further processing. Use programming languages such as Python or Node.js to write scripts that interact with your sensors and save the data to a local file or database.
Data Visualization
To make your IoT data more accessible, consider using visualization tools such as Grafana, Dash, or Matplotlib. These tools allow you to create interactive dashboards and charts that display real-time information about your monitored systems.
Ensuring IoT Security
Security is a critical consideration when implementing remote IoT monitoring with Raspberry Pi. Protect your system by:
- Using strong passwords and enabling two-factor authentication
- Regularly updating your software and firmware
- Implementing firewalls and intrusion detection systems
- Encrypting data transmissions using protocols like HTTPS or MQTT over TLS
Applications of Remote IoT Monitoring
Smart Homes
Remote IoT monitoring with Raspberry Pi can be used to automate and control various aspects of a smart home, such as lighting, heating, and security systems. This enhances convenience and energy efficiency while providing peace of mind to homeowners.
Industrial Automation
In industrial settings, remote IoT monitoring enables real-time tracking of equipment performance and predictive maintenance. This reduces downtime and improves overall productivity.
Conclusion and Next Steps
Remote IoT monitoring with Raspberry Pi offers endless possibilities for innovation and automation. By following the steps outlined in this guide, you can create your own remote monitoring system and take advantage of the benefits it provides. Remember to prioritize security and regularly update your system to ensure optimal performance.
We encourage you to share your experiences and ask questions in the comments section below. Additionally, explore our other articles on IoT and Raspberry Pi for more in-depth insights and tutorials. Together, let's build a smarter, more connected world!
Data and references for this article were sourced from reputable publications such as Raspberry Pi Foundation, IoT For All, and Microsoft Azure IoT.